How I Thrum
Thrummed mittens have been around for a couple of hundred years in Northern Newfoundland and Labrador. The term thrums refers to yarn waste from weaving looms. According to Robin Hansen’s Favorite Mittens (many thanks for the book, Jennifer!), these bits could have at one time been knitted into mittens and other articles for added warmth, but now fleece, roving and, in my case, at least, prepared top are generally favored.
Since people have been knitting these mittens for so long, I really only have one thing to add, other than my hopefully infectious love of these amazingly warm mittens, and that is my opinion that the more thums, the better, and the closer they are to each other, the better. I like a solid, warm, fuzzy blanket inside my mittens, not a sparse, lumpy, sad blanket like some patterns create. Being able to feel the lumps inside is about as annoying to me as a wrinkle in my sock or sock fuzz between my toes. Obviously, I also tend to go a little crazy with the color, which was not how it was done way back when.
Here’s how I thrum:
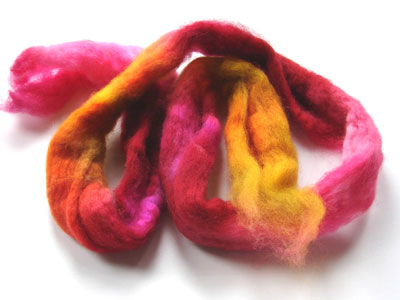
Get your fiber. This is hand-dyed combed top in a soft, fuzzy wool (fine Bluefaced Leicester in this case). You want to use a wool that will stick to itself after you’ve installed it in your mittens. After some wear, the thums will felt together into one soft mass. Merino, Corriedale, fine BFL, or anything that’s soft (a fine to medium fine wool) would be ideal. It will both felt together and please your fingers. I would not recommend superwash wool, as it tends to fall apart. Use top, roving, or locks of wool.* About 2 oz. should do you.
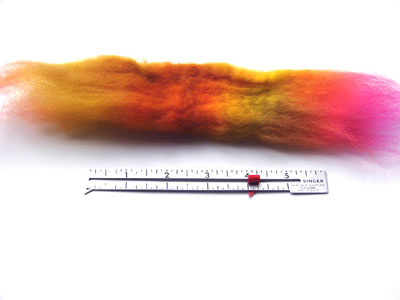
Hold your hands a few inches apart and pull off a piece about 8 inches long.
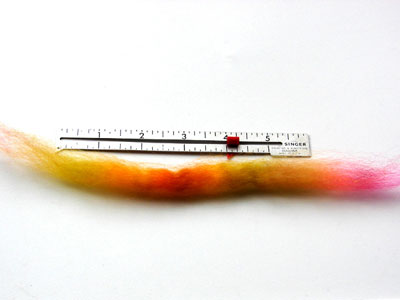
Strip off a thin piece from the side of that chunk.
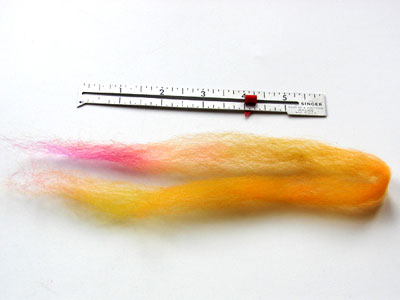
Work your way along this strip, attenuating and teasing the wool apart and fluffing it up. It’s grown in length from the teasing. The more air there is in the wool, the warmer your hands will be.
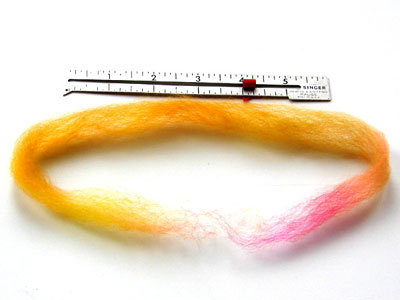
Fold the ends of the thrum to the center and press them in.
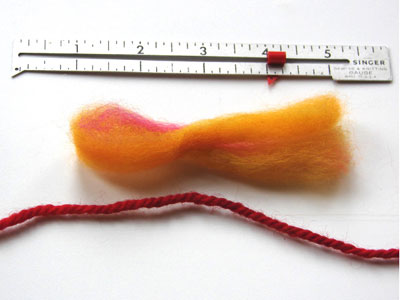
Now, fold the thrum in half, enclosing those pointed ends. This makes everything so tidy. Some patterns call for the thrum to be the same thickness as the yarn. I don’t go for that! No harm has yet been caused by my super fat thrums.
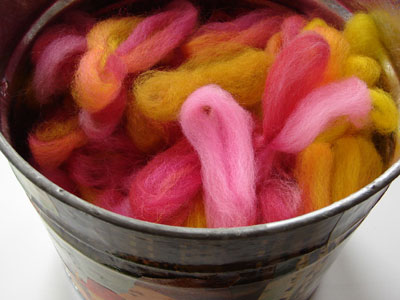
Make a whole bunch.
Now, to knit them in.
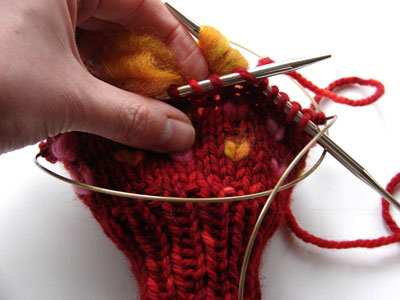
When you get to the spot where you’ll add your thrum, bring your yarn over the needle as usual and put your thrum around the needle, with half above and half below. Pinch it in place with your left hand. Pull both the yarn and thrum through the stitch.
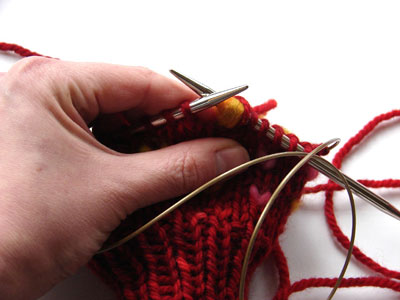
The thrum and yarn stitch are side by side on the needle.
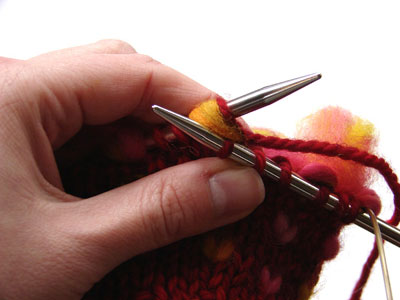
On the next row, when you come to this thrum/yarn stitch combo, knit them as one.
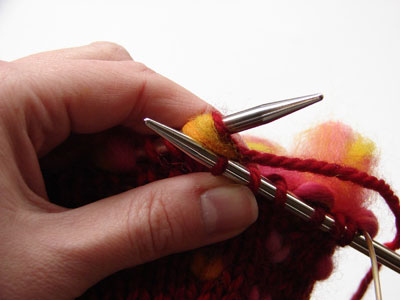
Lovely!
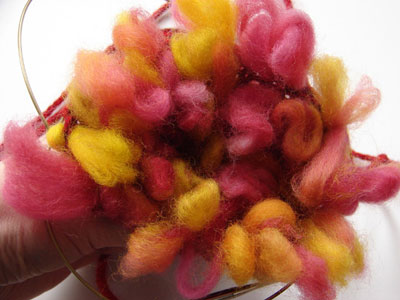
Inside view.
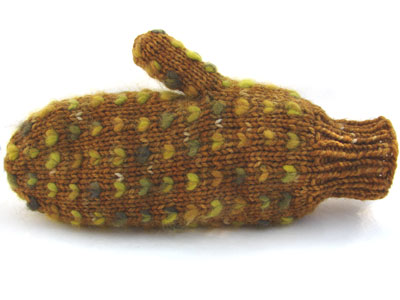
Finished mitten.
Thrums aren’t reserved solely for mittens. You can thrum hats, wrist warmers, and socks, like my lovely friend Susann makes. Imagine!
Here are two popular patterns of thrum placement:


This diagonal pattern would be especially attractive on a pointed-tip mitten. You could line up side decreases with the diagonal line of the thrums.
For yarn, I’d recommend something nicely woolly and worsted weight or thicker. The woolly yarn will latch onto the thrums, and worsted to chunky weight seems to produce an ideal fabric for me. I knit the yarn at a slightly tighter gauge that the ball band calls for. This will help keep the frosty wind out.
If you’re not using a thrum specific pattern, you’ll need to give the pattern some ease, since those thrums take up a lot of room. An inch or two should do you nicely.
Do you live somewhere cold? Make some!
I heartily recommend Robin Hansen’s Favorite Mittens, skimpy though her thrums might be, if you are interested in traditional mitten patterns. I never would have known what a treasure this book is from looking at the cutesy cover.
* To use a lock of wool, you’d fluff it up and attenuate it a bit if it’s short, so that it’s about 3 inches long. Once it’s folded in half and knit in, you’d have a 1″ long thrum sticking out of the back of your thrummed fabric. That would make a lovely warm mitten.
38 Responses to “How I Thrum”
thanks for posting a tutorial! those look really neat. i don’t think i’ll ever need mittens that warm where i live but they’ll make a fun gift for someone in more frigid parts one day!
Wow. You make it look so easy.
I wonder if you could thrum a hat…
I’m pretty sure there isn’t ANY wool around here for thrums. Guess I’ll have to order some next week. :)
Best tutorial on thrummed mittens I’ve seen! Yay thank you!
[Hm, did it not post my comment? weird, it didn’t throw an error or tell me it was hold for moderation or anything… sorry if this shows up twice! :) ]
The mittens look great! I have been yearning to knit thrummed mittens (or really, thrummed anything) for a while now. I should really get on it!
I did have a question though — approximately how much fiber (in weight) do you use for a pair of say, Adrian-sized mitts? (assuming your amounts of thrums per mitten above). :)
Like Vanessa, I probably won’t need thrummed mittens here, except maybe if we lose power in an ice storm! However, it looks like a lot of fun, I may have to put some together for my friends who inhabit the more northern parts of the globe.
Mystery solved! Thanks for the tutorial, very helpful.
You always read my mind! I’ve had thrummed mittens on my mind for a while now!
thanks for the tutorial. there’s been talk of teaching thrumming at “graceful stitches” — we even carry the wool for the thrums.
Very nice, and I could use thrummed mitts, being in Canada and all. The kits will be available when? :-)
Great tutorial, it’s super helpful! Sadly, I’ll have to wait until next winter for my thrummed mittens, since it’s been in the 60s here for the past week.
This is one of those ideas that just really make me admire us humans! So smart and simple. And the color of Mark’s mittens makes me swoon. Beautiful!
They look really neat, but is there really room for a hand in there?
You rock. That’s all. :)
yes! thrumming demystified! this is tremendous!
I just picked up some thrummed mitten kits from Amy at Spunky… one mitten down, one to go! thanks for the help!
Also, made your “hello baby” bonnet— still deciding on “ears? no ears?” — what a great fast pattern!
:) kate
That’s so cool! You really do make it look easy!
Nice tutorial. Pretty bucket o’ fiber!
Thanks so much for posting your tutorial! I have tried making mittens like this before with my angora rabbits fur but they didn’t turn out that good. I am going to try this again using your instructions! I can’t wait to try.
This is interesting….When I make thrums, when I come back the next row, I have to knit the thrum/yarn combo through the back loop, or I don’t get the nice “heart” or “v” shapes — I just get a blob. My first two or three pairs were just blobs — nice blobs (I called them gems), but blobs nonetheless — until someone told me the ktbl trick. But you don’t seem to do that. How is that so?
Thanks so much for this post! I’ve always wanted to know how to make these mittens so that I could alter the pattern by adding more warmth on the inside (and to avoid the lumpiness you speak of) but I have been putting it off. I really like your use of color with the thrums also!
-Moiface
I am so glad you posted this! Thank you thank you thank you. I just don’t have time to get to a thrummed mitten class, and your directions are so lovely! I’m casting on a pair for a Christmas gift (for me!)
I saw an article somewhere on thrummed mittens but the tutorial didn’t really inspire me. Your post, however, makes me want to try thrummed mittens! Thank you for the great post!
I love your color choices! Great tutorial too, I wish it had been around when I first tried my thrum mittens (2nd time worked much better :)
You do the best tutorials! Thanks for the thrum lesson!
Fantastic tutorial! Thanks for the great information =)
Thanks for the thrum advice! When I saw your mittens on the previous post I remembered that this was supposed to be one of my projects this winter! Of course, there’s no rush in western NY State—even though it’s almost March, we’ve got plenty of winter left!
Did you have “The Little Drummer (thrummer) Boy” playing thru your head while making these? pah, thrum pa pa pum, mittens look very nice and toasty!
I am totally doing this… Casey doesn’t ever ask for knits but he was very intrigued by the thrummed mittens he saw somewhere.
I love the pic of the thrums in the bucket. I wanna put my hand in there.
How *completely* cool! Thank you for this!
Hi Adrian,
Now I know what to do with all that blue-faced Leicester I love to buy in your store. One question: How long are those needles you are knitting with? Are you using the 2 needle in the round technique here?
Deborah
This is such an impressive post! I love the tutorial and have already enthusiastically referred other knitters to it.
Thanks for the really great tutorial. I’ve never seen the thrums prepared that way and I will have to give it a try, as they look much more fluffy than other thrummed mitts. Thanks!
Thank you so much.I can’t believe that I have never heard of thrumming.Mittens would be so warm. sincerely Mary
thank you! mystery solved. now i must force myself to finish this second sock so i can cast on some yummy mittens. i just LOVE how colorful your thrums are.
Thanks so much Adrian, I was just attempting a pattern that totally confused me on how to do this…i appreciate you clearing it up.
thanks so muhc…..i finally found good instructions!!!!!!
Thanks for the great how-to for thrummed mittens!! (the owner of the shop where I bought the roving wool didn’t know as much as I did about thrummed mittens!!!!!!! UGH!)I heard of them and just had to make some as I have Raynaud’s and am hoping these will be an answer for me!!!!I have looked for hrs. online for something to show me what the piece of fiber looks like and showing the inside with the mass of fiber as it is, is a GREAT help to me. I made a mitten earlier this evening and I carried the fiber along the inside as you do for fairisle even though I felt that wasn’t correct, but didn’t know any better, so continued – (it did look the same as pictures I had seen on the outside so I continued.) I can’t thank you enough!!!!!!
Thank you for your help! I’m not separating my thrums, but I had never tried it before